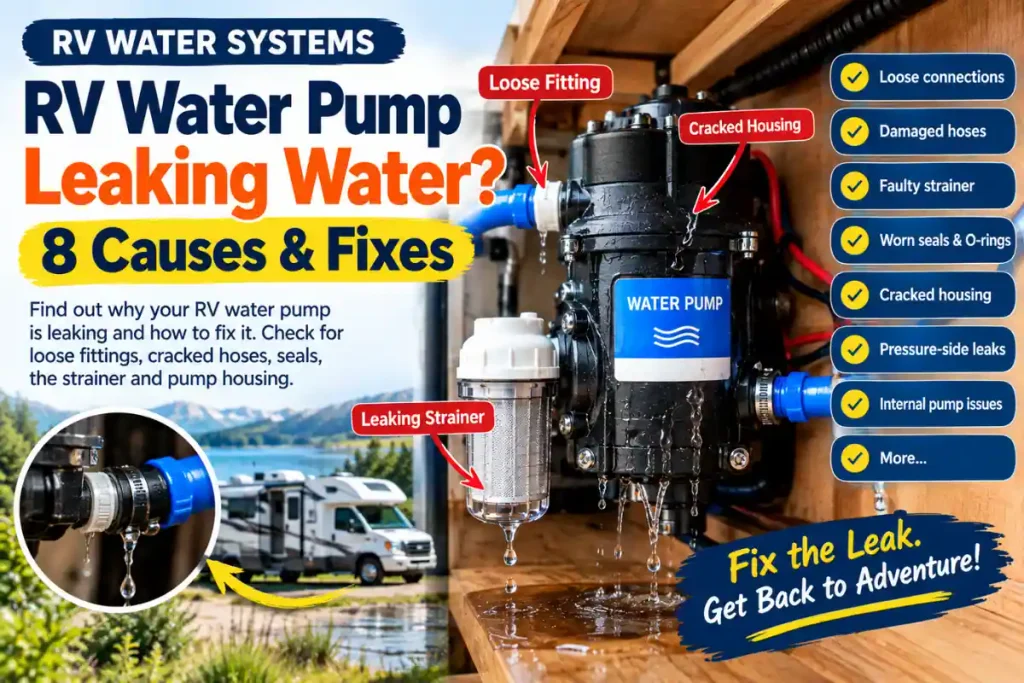
If your RV water pump is leaking water, don’t replace the pump immediately. A water leak can come from a loose fitting, damaged hose, cracked strainer, worn seal, or even a connection near the pump rather than the pump itself.
The good news is that many RV water pump leaks can be identified with a simple visual inspection.
This guide explains 8 common reasons an RV water pump may leak water, what to check first, and when the pump itself may need to be replaced.
Quick Answer
An RV water pump can leak because of:
- A loose water connection
- A damaged or cracked hose
- A loose pump fitting
- A leaking pump strainer
- A damaged O-ring or seal
- A cracked pump housing
- A leaking pressure-side connection
- A damaged pump diaphragm or internal component
Before replacing the pump, locate the exact point where the water is coming from.
First: Turn Off the Water Pump
If water is actively leaking, turn the RV water pump off before troubleshooting.
If the RV is connected to city water, disconnect the city-water supply or shut off the water source as appropriate.
Open a faucet briefly to relieve pressure from the plumbing system.
Then dry the area around the pump with a clean towel.
This makes it much easier to identify where fresh water is coming from.
Safety note: If the pump is located near electrical wiring or electrical components, avoid operating the system while water is accumulating around electrical connections. Disconnect power to the affected equipment if necessary and follow the pump manufacturer’s instructions.
1. A Water Connection Is Loose
One of the simplest causes of an RV water pump leak is a loose connection.
The pump normally has water connections on the inlet and outlet sides. Vibration from normal pump operation can sometimes cause a fitting or connection to loosen.
What to check
Look at:
- Pump inlet connection
- Pump outlet connection
- Threaded fittings
- Hose connections
- Clamps
- Adapters installed around the pump
Dry everything first.
Then turn the pump on briefly and watch the connections carefully.
If water begins appearing around one connection, you may have found the source.
Fix
Depending on the connection, the solution may involve:
- Tightening the fitting
- Replacing a damaged fitting
- Replacing a hose clamp
- Reconnecting the hose correctly
Do not overtighten plastic fittings. Excessive force can damage them.
2. The Pump Inlet Hose Is Cracked
The hose supplying water to the pump can develop cracks, especially near the connection.
A small crack may only leak when the pump is running or when the plumbing system is pressurized.
Look closely at the hose near:
- The pump inlet
- Hose clamps
- Sharp bends
- Connection points
- Areas rubbing against other components
A hose can sometimes look fine from a distance while having a small split underneath.
Fix
If the hose is damaged, replacing the affected section is usually better than trying to permanently seal a deteriorated hose.
Make sure the replacement hose is suitable for the RV’s water system and installed according to the manufacturer’s specifications.
3. A Pump Fitting Is Loose or Damaged
Some RV water pumps use threaded fittings or quick-connect fittings.
A fitting can leak even when the pump itself is working normally.
Look for water around the fitting rather than assuming the pump body is leaking.
Signs of a fitting problem
You may notice:
- Water collecting directly below one fitting
- A small drip after the pump shuts off
- Water appearing only when the pump runs
- Moisture around a threaded connection
Fix
Inspect the fitting for cracks or damaged threads.
If the fitting is damaged, replace it rather than forcing it tighter.
If the connection requires a sealant or thread-sealing method, use only the type recommended by the fitting or pump manufacturer.
4. The Pump Strainer Is Leaking
Many RV water pump installations include a small inlet strainer before the pump.
The strainer can become a source of leaks if:
- Its housing is cracked
- The cap is not properly seated
- The O-ring is damaged
- The connection is loose
- The strainer has been damaged by freezing
Because the strainer is connected directly to the pump inlet, water can appear to be leaking from the pump when the actual problem is the strainer.
How to check it
Dry the strainer completely.
Then inspect:
- The clear housing
- The cap
- O-ring
- Inlet connection
- Outlet connection
Run the pump briefly and watch for fresh water.
Fix
Replace a damaged strainer or O-ring as required.
If the strainer housing is cracked, replacing the housing or complete strainer assembly is generally more reliable than attempting a temporary repair.
5. A Seal or O-Ring Is Worn
Water connections often depend on rubber seals or O-rings.
Over time, an O-ring can become:
- Flattened
- Brittle
- Cracked
- Deformed
- Damaged during installation
A small damaged seal can create a surprisingly persistent leak.
Where to look
Check connections around:
- The pump inlet
- Pump outlet
- Strainer
- Filter
- Quick-connect fittings
If the connection uses an O-ring, inspect it rather than simply tightening the fitting further.
Fix
Replace the damaged O-ring with the correct size and type.
Do not assume that any generic rubber ring will be suitable for the application.
6. The Pump Housing Is Cracked
If water is coming directly from the pump body, the housing itself may be damaged.
This can happen because of:
- Freezing
- Physical damage
- Excessive stress on the plumbing connection
- Age-related deterioration
- Installation problems
A freeze-damaged pump can sometimes develop cracks that are difficult to see until the system is pressurized.
How to check
Dry the pump completely.
Inspect the pump housing carefully while the system is pressurized.
Look for:
- Hairline cracks
- Water emerging from the pump body
- Cracks around fittings
- Water coming from a seam or joint
If water is clearly coming through a cracked pump housing, tightening external fittings will not solve the problem.
Fix
A cracked pump housing generally means the damaged component or complete pump assembly needs replacement, depending on the manufacturer’s service instructions.
7. A Pressure-Side Connection Is Leaking
The pump outlet sends pressurized water into the RV plumbing system.
A leak on the pressure side can appear only after the pump builds pressure.
This can make troubleshooting confusing because everything may look dry while the pump is initially running.
Then a small drip starts after pressure builds.
Check the outlet side
Inspect:
- Pump outlet fitting
- Hose connection
- Clamps
- Adapters
- Nearby plumbing joints
Dry the area and observe it while the pump operates.
If water appears only after the pump pressurizes the system, pay particular attention to the pressure-side connections.
8. The Pump Has an Internal Leak
Sometimes the external plumbing is not the problem.
If water is coming from inside the pump assembly, an internal component may be damaged.
Depending on the pump design, the problem could involve:
- Internal diaphragm
- Internal seal
- Pump head
- Valve components
- Housing damage
At this point, the pump itself may need service or replacement.
Before buying a new pump, check the manufacturer’s troubleshooting and repair information for your specific model.
How to Find the Exact Leak
If you’re not sure where the water is coming from, use this simple procedure.
Step 1: Turn the pump off
Relieve water pressure by opening a faucet briefly.
Step 2: Dry everything
Use a clean towel around the entire pump assembly.
Step 3: Inspect the connections
Check the inlet, outlet, strainer and nearby fittings.
Step 4: Turn the pump on
Watch the area carefully as pressure builds.
Step 5: Look for the first wet spot
The highest or first wet point is often more useful than the puddle underneath the pump.
Water can travel along hoses, fittings or the pump housing before dripping onto the floor.
RV Water Pump Leak Diagnosis Table
| What you see | Possible cause | What to check |
|---|---|---|
| Water around inlet | Loose hose or fitting | Inlet connection |
| Water around strainer | O-ring, cap or cracked housing | Pump strainer |
| Water from outlet | Loose pressure connection | Outlet fitting |
| Water from pump body | Housing or internal damage | Pump assembly |
| Leak only when pump runs | Pressurized connection | Outlet and plumbing |
| Slow drip after shutdown | Connection or seal | Fittings and O-rings |
| Water after freezing | Freeze damage | Pump, strainer and hoses |
Should You Replace the RV Water Pump?
Not necessarily.
A leaking pump does not automatically mean the pump has failed.
For example, if the leak is caused by a loose fitting or damaged strainer, replacing the entire pump would waste money.
Try to identify the exact leak first.
The pump may not need replacement if:
- A fitting is loose
- A hose is damaged
- An O-ring is leaking
- The strainer is cracked
- A clamp has failed
Pump replacement may be necessary if:
- The pump housing is cracked
- An internal component is leaking
- The pump has significant freeze damage
- The manufacturer specifies replacement rather than repair
What If the Pump Is Leaking and Running Continuously?
A water leak can cause the pump to lose pressure.
When pressure drops, the pump may turn back on.
That can create a cycle where the pump:
Runs → builds pressure → loses pressure → starts again
If you notice this behavior, don’t assume the pressure switch is automatically the problem.
First check for a plumbing leak.
For more troubleshooting, see:
RV Water Pump Keeps Running? 9 Causes & Fixes
and
RV Water Pump Cycles On and Off? 8 Causes & Fixes
What If There Is No Visible Leak?
If the pump runs frequently but you cannot find visible water, the problem may be somewhere else in the RV plumbing system.
Check:
- Faucets
- Shower
- Toilet valve
- Exterior shower
- Water heater connections
- Under-sink plumbing
- Fresh-water lines
- Water filters
- Other pressure-side fittings
A very small leak may not leave an obvious puddle.
Final Troubleshooting Checklist
Before replacing your RV water pump, check these items:
- Turn the pump off
- Relieve water pressure
- Dry the pump and surrounding area
- Check the inlet connection
- Check the outlet connection
- Inspect the pump strainer
- Check hoses and clamps
- Inspect O-rings and seals
- Look for cracks
- Run the pump briefly and observe
- Identify the first point where water appears
- Replace only the failed component when practical
Frequently Asked Questions
Can an RV water pump leak from the bottom?
Yes. Water can collect underneath the pump even when the actual leak is coming from an inlet, outlet, strainer or nearby fitting. Dry the entire area and identify where fresh water first appears.
Can a loose fitting make an RV water pump leak?
Yes. Loose or damaged fittings are among the first things to check when troubleshooting a water pump leak.
Can freezing damage an RV water pump?
Yes. Freezing water can damage pump components, housings, hoses and strainers. If a leak appeared after winter storage or freezing temperatures, inspect the system carefully for freeze damage.
Should I use sealant to stop an RV water pump leak?
It depends on the type of connection. Follow the pump and fitting manufacturer’s instructions. Do not use sealant as a substitute for replacing a cracked component or damaged seal.
Why does my RV water pump leak only when it is running?
The pump creates pressure while operating. A weak connection or damaged component may remain dry when the system is not pressurized but leak once pressure increases.
Related RV Water Pump Guides
If you’re troubleshooting another water-pump problem, these guides may help:
- RV Water Pump Runs But No Water Comes Out? 9 Causes & Fixes
- RV Water Pump Won’t Build Pressure? 8 Causes & Fixes
- RV Water Pump Keeps Running? 9 Causes & Fixes
- RV Water Pump Cycles On and Off? 8 Causes & Fixes
- RV Water Pressure Too Low? 9 Causes & Fixes
Bottom Line
An RV water pump leak does not always mean the pump itself has failed.
Start by locating the exact source of the water. Check the inlet and outlet connections, hoses, strainer, O-rings and nearby plumbing before deciding to replace the pump.
Diagnose the leak first. Replace the part only when you know what failed.