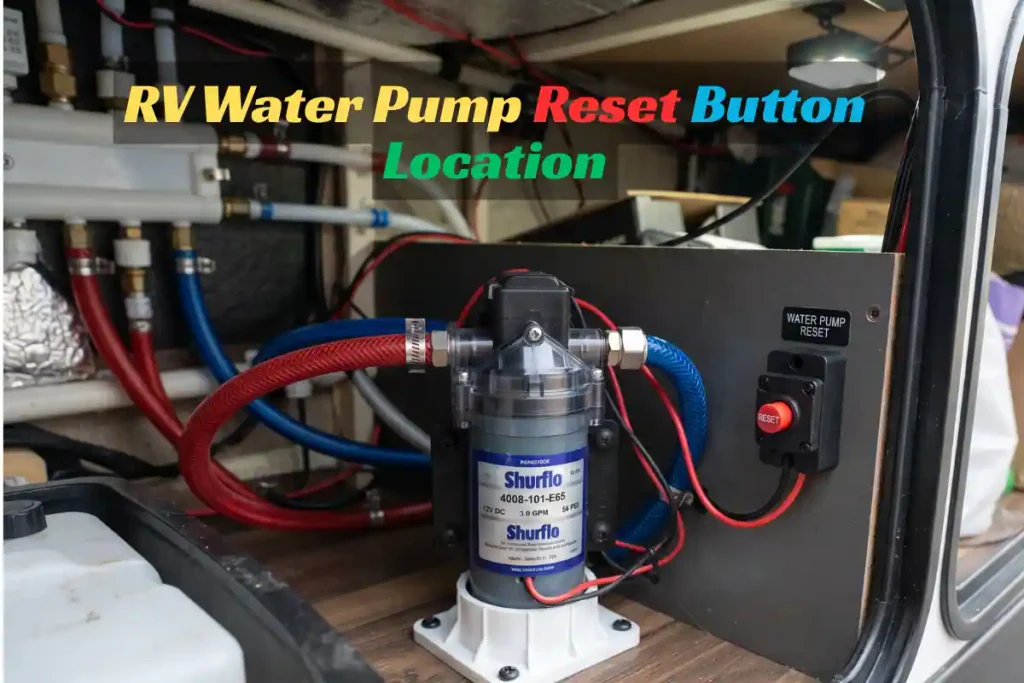
If your RV water pump suddenly stops working, one of the first things you may search for is a reset button. The catch is that most RV freshwater pumps do not have a dedicated, user-operated reset button like a circuit breaker.
Instead, what you need to check may be the pump’s ON/OFF switch, the RV’s 12-volt fuse, battery voltage, pressure-switch operation, wiring, inlet strainer, or thermal protection built into the pump.
Some pumps can also stop temporarily when the motor becomes too hot. Depending on the design, thermal protection may interrupt operation and allow the pump to operate again after it cools. The exact protection and reset behavior varies by pump model.
So if you’re looking for an RV water pump reset button location, don’t assume there is a physical button hidden somewhere on the pump. The first step is to identify the pump and understand how its electrical and pressure-control system works.
Does an RV Water Pump Have a Reset Button?
Usually, there is no universal RV water pump reset button.
Most automatic-demand freshwater pumps operate from the RV’s 12-volt DC electrical system. When you open a faucet, pressure in the plumbing falls. The pump’s pressure switch detects the pressure change and starts the motor.
When you close the faucet, pressure rises again. Once the system reaches the pump’s shutoff pressure, the pump normally stops.
Some pump models use an internal bypass or other control arrangement, so the exact operating behavior depends on the pump design.
This is why a pump that suddenly stops does not necessarily need a manual reset.
Possible causes include:
- Blown 12-volt fuse
- Pump switch turned off
- Weak or discharged house battery
- Loose or corroded electrical connection
- Poor ground connection
- Pressure-switch problem
- Clogged inlet strainer
- Air entering the suction side
- Empty freshwater tank
- Thermal protection activating
- Failed motor or another internal pump component
The important distinction is that a fuse is electrical protection, not a reset button. If a fuse has blown, replace it only with the correct type and rating after considering why it failed.
Never install a larger fuse simply because the original one keeps blowing.
Where Is the RV Water Pump Located?
Before you start searching for a reset device, locate the pump itself.
RV manufacturers place freshwater pumps in different locations depending on the floor plan, tank location, plumbing arrangement, and available service space.
Common locations include the following.
Under the Bed
Many travel trailers and motorhomes place the freshwater pump beneath a bed or inside a storage compartment.
Look for an access panel, removable floor section, or service hatch. The pump is usually identifiable by its motor housing, water connections, and 12-volt electrical wiring.
Under the Kitchen Sink
Smaller RVs may have the pump underneath the kitchen sink or inside a nearby cabinet.
Move stored items out of the way and look behind the plumbing. You may see the pump connected to flexible tubing, electrical wires, and an inlet strainer.
Inside an Exterior Storage Compartment
Some RV manufacturers install the pump inside a basement or exterior-access storage compartment.
This can make the pump easier to reach for maintenance because you may not need to remove interior furniture.
Near the Freshwater Tank
Another common arrangement is to install the pump near the freshwater tank or along the tank’s outlet plumbing.
The exact distance depends on the pump manufacturer’s installation requirements. For example, certain Flojet RV pumps specify installation within about 6 feet (1.8 meters) of the water tank for best performance. That is a model-specific recommendation, not a universal six-foot rule for every RV pump.
Always follow the installation requirements for your particular pump.
Where Is the RV Water Pump Reset Switch?
The term “reset switch” can describe several different things. They are not interchangeable.
The Water Pump ON/OFF Switch
The pump switch is usually the first thing to check.
Depending on the RV, it may be located:
- Near the kitchen sink
- On the main control panel
- In the bathroom
- Near the entrance
- On a multiplex control panel
- Within a digital RV control system
The switch does not necessarily perform a mechanical reset. Depending on the RV’s electrical architecture, it may control power to the pump circuit or send an operating command through the RV’s control system.
Turn the pump switch off while performing basic troubleshooting. Once you’ve checked the relevant conditions, turn it back on and test the system.
The 12-Volt Fuse
The pump’s fuse is another important item to check.
It is often located in the RV’s main 12-volt DC fuse panel rather than next to the pump.
Look for labels such as:
- Water Pump
- Pump
- Fresh Water
- Water System
- 12V Pump
The fuse rating is not universal. Use the rating specified by your RV manufacturer, pump manufacturer, or the electrical documentation for your particular installation.
If the replacement fuse blows again, don’t keep installing new fuses. A recurring blown fuse can indicate a short circuit, damaged wiring, excessive current draw, a seized motor, or another fault that requires diagnosis.
Internal Thermal Protection
Thermal protection is another reason a pump may appear to have stopped without a visible reset button.
Some RV pumps incorporate thermal protection that can interrupt motor operation when the motor becomes excessively hot.
Depending on the pump design, operation may resume after the pump cools. However, you should not assume every pump uses the same thermal-protection or reset behavior.
If overheating is suspected, switch the pump off, allow it to cool, and follow the manufacturer’s instructions for the specific model.
If the pump repeatedly overheats, simply allowing it to cool is not a complete repair. The underlying cause should be investigated.
How to Reset or Restart an RV Water Pump
Because most RV freshwater pumps don’t have a dedicated reset button, “resetting” the pump usually means restoring the correct electrical and water conditions and then restarting it.
Use this sequence as a general troubleshooting starting point.
Step 1: Turn Off the Pump Switch
Turn the water pump switch off.
This gives you a controlled starting point for checking the system.
If you suspect the pump stopped because of overheating, leave it off while the motor cools. Follow the manufacturer’s instructions for your particular pump rather than relying on a fixed cooling time.
Step 2: Check the Freshwater Supply
If you’re using the onboard freshwater tank, make sure it actually contains water.
An empty tank obviously cannot supply the pump.
Don’t rely entirely on the tank monitor. RV tank sensors can sometimes display inaccurate readings.
Also check for an obvious closed valve, blocked tank outlet, or plumbing problem between the tank and pump.
Step 3: Check the 12-Volt Power Supply
The pump needs adequate electrical power to operate correctly.
A weak house battery can cause a pump to run poorly, fail to start, or behave inconsistently.
Other 12-volt equipment may still appear to work even when the pump has a power-supply problem because different devices draw different amounts of current.
When appropriate and when you know how to use a multimeter safely, check voltage at the pump while troubleshooting.
Step 4: Check the Pump Fuse
Locate the RV’s DC fuse panel and identify the fuse protecting the water-pump circuit.
If it is blown, replace it with the exact type and rating specified for the installation.
Then turn the pump switch back on and open a cold-water faucet.
If the new fuse blows immediately, stop replacing fuses. The circuit or pump needs further diagnosis.
Step 5: Open a Faucet
Turn the pump on and open a cold-water faucet.
Listen to what the pump does.
If the pump is operating normally, you should generally hear the motor start as system pressure drops.
If there is no sound or vibration, investigate the electrical supply, fuse, switch, wiring, ground, pressure-switch operation, and motor.
If the motor runs but water does not reach the faucet, focus on the freshwater supply, suction side, inlet strainer, air leaks, priming, and plumbing.
Step 6: Inspect the Pump Inlet Strainer
Many RV freshwater pump installations use an inlet strainer or filter between the tank and pump.
Turn the pump off and relieve pressure before servicing the strainer.
Look for:
- Sediment
- Dirt
- Plastic particles
- Tank debris
- Other contamination
A restricted inlet can limit the water reaching the pump and can make a working motor appear to be a failed pump.
Clean the strainer according to the manufacturer’s instructions.
What If Your RV Water Pump Runs but Doesn’t Pump Water?
This is one of the most confusing RV water-pump problems.
You can hear the motor running, but the faucet produces little or no water.
In this situation, a reset is usually not the first thing to investigate.
Check the Freshwater Tank
Make sure the tank contains water.
If the tank has recently been emptied and refilled, air may also have entered the suction line.
Check for Air in the System
Air can enter the plumbing after the freshwater tank has been emptied, a fitting has been disconnected, or pump plumbing has been serviced.
Open a faucet and let the pump operate according to the manufacturer’s instructions.
The faucet may initially sputter while air leaves the system.
Inspect the Suction-Side Connections
Examine the plumbing between the freshwater tank and pump inlet.
A loose fitting on the suction side can allow air into the pump without necessarily producing an obvious water leak.
That air can prevent the pump from establishing normal suction.
Check hose connections, fittings, clamps, and the inlet strainer connection.
Check the Inlet Strainer
Remove and inspect the pump’s inlet strainer according to the manufacturer’s service instructions.
A blocked strainer can restrict the pump’s water supply.
If the strainer is dirty, clean it properly before testing the pump again.
Don’t Assume Every Pump Can Run Dry
Different RV pump models have different specifications concerning dry running.
Some pumps are specifically designed to tolerate dry operation, while you should not assume the same capability for every model.
If the pump has been running without water, check the manufacturer’s documentation for your exact model rather than applying a universal rule.
What If the Pump Won’t Turn On at All?
If the pump makes no sound and produces no vibration, start with the electrical side.
Check:
- Pump switch
- 12-volt fuse
- House battery condition
- Positive power connection
- Ground connection
- Wiring
- Connectors
- Voltage at the pump
- Pressure-switch operation
- Pump motor
A multimeter can make this diagnosis much faster.
With the pump commanded on, voltage testing can help determine whether electrical power is reaching the pump.
If the pump is receiving the appropriate voltage but remains completely inactive, the pump or one of its internal components may be faulty.
If voltage is not reaching the pump, work backward through the circuit and check the fuse, switch, wiring, connectors, and ground.
If you’re not comfortable testing a 12-volt electrical circuit, have an RV technician perform the diagnosis.
What If the RV Water Pump Keeps Running?
A pump that runs continuously is a different problem from a pump that refuses to start.
First, close every faucet and check for visible leaks.
Inspect:
- Kitchen faucet
- Bathroom faucet
- Shower
- Outside shower
- Toilet valve
- Water-heater plumbing
- Under-sink plumbing
- Pump connections
- Other freshwater plumbing
Even a small leak can prevent the system from reaching the pump’s normal shutoff pressure.
If there are no obvious leaks, possible causes include:
- Air entering the suction side
- Restricted inlet
- Low water supply
- Internal pump wear
- Damaged valve or diaphragm
- Pressure-switch problem
- Pump bypass/control issue, depending on model
Don’t automatically adjust the pressure switch.
Some pumps have adjustable pressure switches, while others are designed around fixed settings or different control arrangements.
Before making an adjustment, identify the exact pump model and follow its service instructions.
Where Is the RV Water Pump Fuse?
The pump fuse is commonly located in the RV’s main 12-volt DC fuse panel.
Depending on the RV design, the panel may be:
- Under the dashboard
- Near the converter
- Under a bed
- Inside a cabinet
- Near the entrance
- Behind an electrical access panel
Look for a fuse labeled Water Pump, Pump, or a similar description.
If the panel isn’t clearly labeled, check the RV owner’s manual, electrical diagram, or fuse-panel legend.
There is no universal fuse-panel location because manufacturers use different electrical layouts and floor plans.
What If You’re Connected to City Water?
This is an easy detail to overlook.
If your RV is connected to a pressurized city-water supply, the onboard freshwater pump normally isn’t required to provide water to the faucets under normal conditions.
That means the pump may remain off even though you have normal water flow from the faucets.
If you have normal water pressure when connected to city water but no water when relying on the freshwater tank, focus your troubleshooting on the tank, pump switch, pump fuse, pump power, inlet strainer, suction-side plumbing, and pump itself.
The city-water connection and onboard freshwater system are related parts of the RV plumbing system, but they are not the same water source.
A Common Mistake: Looking at the Water Heater Instead
The terms “water pump” and “water heater” are sometimes confused because both are part of the RV’s water system.
They perform different jobs.
The freshwater pump moves water through the RV’s plumbing.
The water heater heats that water.
If you have no water flow, investigate the pump, tank, plumbing, and water supply.
If you have normal water flow but the water isn’t hot, investigate the water heater.
Water-heater reset and safety procedures vary by heater type and model. Don’t apply a water-pump troubleshooting procedure to a water heater.
A Real-World Troubleshooting Example
Imagine you’re parked at a campground after driving several hours. You turn on the kitchen faucet and get no water.
Your first thought is that the water pump needs a reset.
Instead, you start with the basic checks.
You turn on the pump switch and hear nothing. The freshwater tank is half full, so the tank itself doesn’t appear to be empty.
You check the 12-volt fuse and discover that it has blown.
After installing the correct replacement fuse, the pump starts running.
However, the faucet only spits air instead of producing a steady stream.
You inspect the pump inlet and find that the suction-side connection isn’t properly sealed. Air is entering the inlet, preventing the pump from establishing normal suction.
After correcting the connection and allowing the system to purge the trapped air, normal water flow returns.
The important lesson is that there wasn’t necessarily a reset button to press. The actual problem was identified by checking the electrical and plumbing systems in sequence.
How to Find the Exact Reset or Protection Device on Your Pump
If you believe your particular pump has a reset or thermal-protection feature, identify the pump before doing anything beyond basic checks.
Look at the pump housing for:
- Brand name
- Model number
- Serial number
- Voltage rating
- Identification label
Take a clear photograph of the label if necessary.
Then locate the manufacturer’s owner’s manual, installation manual, or service documentation for that exact model.
This is much more reliable than searching for a generic “RV pump reset button.”
RV manufacturers use different pumps, wiring systems, control panels, fuses, and plumbing layouts. Even two RVs from the same manufacturer can place the pump and fuse panel in different locations.
The pump manufacturer’s documentation is therefore the best source for model-specific information about thermal protection, pressure-switch settings, wiring, installation, service, and troubleshooting.
Should You Replace the RV Water Pump?
Don’t replace the pump simply because it stopped working.
First determine whether the problem is electrical, mechanical, or related to the water supply.
A pump that receives appropriate electrical power but doesn’t operate may have an internal fault.
A pump that runs but doesn’t move water may instead have a blocked inlet, suction-side air leak, loss of prime, empty tank, or another plumbing problem.
A pump that repeatedly blows its fuse may have an electrical fault, excessive current draw, damaged wiring, or a motor problem.
Diagnosis should come before replacement whenever practical.
When You Should Stop Troubleshooting
Basic checks are reasonable for many RV owners, but stop if the problem points toward an electrical or mechanical fault you cannot safely diagnose.
Get professional help if:
- The pump repeatedly blows its fuse
- Wiring becomes unusually hot
- You smell burning insulation
- You see melted wiring or connectors
- The pump has significant water damage
- The motor makes unusual grinding or mechanical noises
- The pump repeatedly overheats
- The pump continues running after plumbing leaks have been eliminated
- You’re uncomfortable testing 12-volt electrical circuits
Disconnect the appropriate power source before working directly on wiring or pump components, and follow the manufacturer’s service instructions.
Quick RV Water Pump Reset Checklist
If your RV water pump suddenly stops, work through this checklist:
- Turn the pump switch off.
- Check the freshwater tank level.
- Check the 12-volt fuse.
- Check the house battery and electrical supply.
- Check pump voltage when appropriate and safe to do so.
- Turn the pump switch back on.
- Open a cold-water faucet.
- Listen for motor operation.
- Inspect the inlet strainer.
- Check suction-side connections for possible air leaks.
- Check the freshwater plumbing for leaks if the pump won’t shut off.
- If overheating is suspected, allow the pump to cool according to the manufacturer’s instructions.
- Identify the exact pump model before adjusting a pressure switch or performing model-specific service.
- If the fuse keeps blowing or wiring shows signs of overheating, stop troubleshooting and diagnose the underlying fault.
Related RV Water Pump Guides
If you’re troubleshooting another water-pump problem, these guides may help:
- RV Water Pump Runs But No Water Comes Out? 9 Causes & Fixes
- RV Water Pump Won’t Build Pressure? 8 Causes & Fixes
- RV Water Pump Keeps Running? 9 Causes & Fixes
- RV Water Pump Cycles On and Off? 8 Causes & Fixes
- RV Water Pressure Too Low? 9 Causes & Fixes
- RV Water Pump Leaking Water?
Final Answer: Where Is the RV Water Pump Reset Button?
In most RVs, you should not expect to find a universal, user-operated RV water pump reset button.
Instead, a pump that has stopped working may have an issue with the ON/OFF switch, 12-volt fuse, battery or electrical supply, wiring, pressure switch, freshwater supply, inlet strainer, suction-side plumbing, or internal thermal protection.
Some pumps use thermal protection that can interrupt motor operation when the pump overheats and may allow operation to resume after the motor cools. The exact behavior depends on the pump model.
The most reliable approach is to locate the pump, identify its manufacturer and model number, and then follow the manufacturer’s troubleshooting instructions.
If your pump has completely stopped, start with the pump switch, fuse, electrical supply, freshwater supply, and basic plumbing checks before assuming the pump needs to be replaced.
A few minutes of systematic diagnosis can identify a blown fuse, loose connection, blocked inlet, empty tank, or suction-side air leak—and potentially save you from replacing a pump that is still perfectly serviceable.